How To Create PROV file Configuration Settings Using Prov Generator

Posted by Unknown Sabtu, 31 Agustus 2013 0 komentar
How To Create PROV file Configuration Settings

Firstly Download the PROV Generator here

What is Prov?
PROV is a self made configuration file that contain any IP and PORT you want for Nokia s40 Java phone.

Now Prov file is very Important because of the use of Mobile Application e.g Opera,Bolt,Nimbuzz, ucweb, mozat and 2go etc. I will try to make this Tutorial straight forward for the Newbies.

If you have any IP for your Opera or other Application on Nokia Java S40 Phones, You can't input it into the Personal Configuration Settings,You've to create a Prov for it to work with that IP and PORT.

NOTE: Prov those not work for Sony Ericsson Phone or Nokia Symbian Phone, It only works for Nokia S40 Phone e.g Nokia3110C,2770C1,6300,6303c,5130XP,5610XpressMusic,NokiaC1,NokiaX2,X300,NokiaC3,Asha 201, Asha 202,Asha 203 ,Asha 300 and Asha 303 and many more other too numerous to be mentioned.

How To Create PROV file Configuration Settings

LETS GET STARTED.
1. If you have any Tweak for Opera, Ucweb or any other handler Application e.g;

IP: 010.199.212.002

PORT: 8080

Access Point Name (APN): web.gprs.mtnnigeria.net

Or any other APN based on your Network that you've use.

Then in your Handler Application you'll see like this.

Custom Server: http://server4.operamini.com

Host Or Real host: www.mtnonline.com

2. You've to create a Prov file with the IP and PORT above or based on your tweaks,You can also Create your Own Prov Configuration Online Just choose the Network that you want to Create Prov for and Insert the IP and Port, Then download it to your Phone.

How To Create PROV file Configuration Settings

3. Always if want download Prov file that you created Online into your phone you download it via OperaMini or UCBROWSER Don't ever use your Phone Normal Default Browser,during downloading it. Get a Sony Ericsson Phone or Nokia Symbian Phone or China phone.

4. Send the Prov file you downloaded on your Phone to the Other Phone you collected from someone e.g from your Phone to someone sony ericsson or symbian phones or china phones.

5. Re-Send the Prov file from that Phone back to your phone through Bluetooth,The File will come into your Nokia java phone like this "CONFIGURATION SETTINGS RECIEVE" then you can Save and Activate it as your defaul settings.

6. Then Go to Settings=>>> Configuration >>> Default Configuration Settings. Then Choose the Prov File that you just send to your Phone and press OK on it, then select it and also click on the Activate Default on all Applications.

7. Then go back and also click on the the Default Access Point and also choose the New Prov and Activate it, Now you are done.

You can now Open your OperaMini and Input the Tweak into your http Custom Server and Host/Real host and You are Ready to Go!

This is just for the Beginners, and I hope this tutorial will help and guide you about to Configure your Nokia Java phone easily, also if you have any question about this you can CONTACT US for more info or drop your comment here.

Baca Selengkapnya ....

FORMAT/ HARD RESET ON BOOT UP TUTORIAL IN NOKIA SYMBIAN PHONE INCLUDES N8-00 AND NOKIA N97

Posted by Unknown Kamis, 29 Agustus 2013 0 komentar
FORMAT/ HARD RESET ON BOOT UP TUTORIAL IN NOKIA SYMBIAN PHONE


• WARNING :: You should take backup for all, Because all data will erased or delete while hard format Its always a good idea to do format once every few month or even when you first get your new S60 device.

• There is 2 ways to do a hard format to the device memory of your symbian.

• Once if see ur s60 device too slow and ur suspecting the virus attack the phone.

• If ur phone is powered on and at the home screen type or Dial this code *#7370# and then enter your security code (default is 12345) and then your device will automatically formated restarting
and boot up.

• To hard reset when the device is off hold down the GREEN CALL KEY, the number 3 KEY and the STAR *+ KEY, and Power ON the phone.

• Then continue to hold the keys and now hold the power key, hold all 4 keys until the device boots up and asks u for select ur country etc.

MUST READ THIS: Learn how to Hacked Nokia
Symbian phone s60v3 &
s60v5 Symbian Anna and
Symbian Belle


• NOTE: if you own a Nokia 5800XM then the second option is,hold the GREEN KEY and RED CALL keys, and the CAMERA capture key and then the POWER KEY, hold them until the device boots up and asks for country 5800XM.

FORMAT/ HARD RESET ON BOOT UP TUTORIAL IN NOKIA SYMBIAN PHONE

•NOTE: if you own a nokia N97 then the second option is,Hold the LEFT SHIFT key, the SPACE BAR and the BACK KEY then the POWER KEY, hold them until the device asks for selecting the country N97.

FORMAT/ HARD RESET ON BOOT UP TUTORIAL IN NOKIA SYMBIAN PHONE

• NOTE if you own a Nokia N8-00 then the option is. Hold the MENU KEY, the CAMERA and the VOLUME DOWN BUTTOM then the POWER KEY, hold them until the device asks for the country etc. Nokia N8-00

FORMAT/ HARD RESET ON BOOT UP TUTORIAL IN NOKIA SYMBIAN PHONE

• If your device fails to boot up or gives a contact the retailer message then a hard format on boot will usualy sort the problem.

• WARNING: doing a hard reset will DELETE all user data on the device memory, including contacts, calendar entries and any apps that you have installed it to C: drive, your mass memory/memory card will remain unaffected so any data will still be there, how ever you may have to reinstall some applications even if they are installed to mass memory/memory card.

• But you need to remember, after you do this, you will lose Ovi Maps and Ovi Store. so, before you do a hard reset nokia N8 you should be careful.

Baca Selengkapnya ....

China to land first probe on moon this year

Posted by Unknown 0 komentar

The lunar probe is the final part of a three-stage moon mission. Chinese scientists are exploring the possibility of sending a man to the moon after 2020.


BEIJING — China will land its first probe on the moon at the end of this year, state media reported on Wednesday, the next step in an ambitious space program which includes eventually building a space station.


In 2007, China launched its first moon orbiter, the Chang'e One orbiter, named after a lunar goddess, which took images of the surface and analyzed the distribution of elements.

That launch marked the first step in China's three-stage moon mission, to be followed by an unmanned moon mission and then the retrieval of lunar soil and stone samples around 2017.

The official Xinhua news agency said that the Chang'e Three was on track for a landing toward the end of the year.
Read full article at:
www.reuters.com

Baca Selengkapnya ....

Technology Will Not Replace Teachers

Posted by Unknown 0 komentar
Photo Credit: PhOtOnQuAnTiQue

There, I said it. And with these words, I am jumping with both feet into a debate that has alternately raged and simmered since computers first began appearing in schools in the 1980s.

The debate was reignited recently when Massive Open Online Courses (MOOCs), online courses designed for large-scale global participation, became one of the hottest topics in education.
I wrote about MOOCs in my last LinkedIn Influencer post, “Education is Having Its Internet Moment.” MOOCs have huge potential to increase access to education, and especially to expert explainers. But we know that explaining represents just one aspect of teaching. Even as technologies for learning become more evolved, they will not replace teachers -- anymore than commercial airliner cockpit technology has replaced pilots.

Few would argue that without Captain Sully Sullenberger, a former fighter pilot with nearly 30 years of commercial aviation experience, there would have been no miracle on the Hudson.

Read full article by: Karen Cator, President and CEO of Digital Promise

Baca Selengkapnya ....

Learn How To Install Blogger Template easily For Newbie

Posted by Unknown 0 komentar
Installing Blogger Template is a simple Process,but new bloggers sometime take a wrong step and as a result they lose their all blog posts/content.In this regard i will share some tips about how to install a blogger template. Installing any blogger template to blog is not a great deal,So Uploading Template to blogs just require some steps which are mentioned below.

1. Backup: The main thing is when ever you want to upload/install a template to your blog,must backup your Blog template,if you if did not may be you lost your blog posts.

2. Extracting Blog template and uploading to your blog.

3. Editing and installing.

4. Never Remove Copy Rights

HOW TO BACKUP BLOGGER TEMPLATE
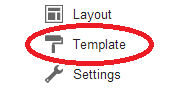
Now Visit Blogger dashboard. Click On Template (See the image below)

How To Install Blogger Template easily

See here and there, you will see Restore/Backup at the left site of your blogger,most of your PC Screen (Shown Below)

How To Install Blogger Template easily

Now Click On Download Full template look the blow image.

How To Install Blogger Template easily

Now you will see a file in Downloads Directory (some thing like template12344. xml) and that's it.


How To Install Blogger TemplateNow goto your Blogger Dasbaord Then Click on template and now Click On Backup/restore A Box will pop up Click on Chose File Now Select the .XML File of template and hit upload That's it, you have uploaded the template :D.

Extracting Template from RAR: You may have seen that usually bloggers upload template in RAR Files, so now you have to extract the template from RAR.

For Extracting follow the belowt steps. Click On Template (which is in .RAR File) Now Right Click on filename.xml and click on Extract, then select Desktop and now you will see that file has been extracted to the Desktop.

Can I Remove Copyrights? Template Authors wasted too much time on designing a Blogger template,and another thing they are allowing you to download the template for free. So as a Credit award to them with the footer link of their blog. If you remove Copy Rights they can surely report your blog to DMCA and as a result of that your blog will be deleted within 24 hours.So Be Care full, always be original,never edit or copy.

Hit the share bottom and invite your friend..

Baca Selengkapnya ....

HOW TO ADDED A SITEMAP WIDGET TO YOUR BLOG

Posted by Unknown Rabu, 28 Agustus 2013 0 komentar
As your a good blogger Must Get a Sitemap Widget for Your Blogger blog.

Sitemap is an organized list of a site's webpages which is accessible to visitors and web crawlers.

Sitemap documents are in xml for search engine bots to index the site; and html for visitors to easily find the content of the site just like a map. I will zero in on this type of sitemap for visitors and how you can add it to your blogger blog.

HOW TO ADDED A SITEMAP WIDGET TO YOUR BLOG


The purpose of making your sitemap available to visitors is that they can easily access every single post in your blog. And it will definitely increase your traffic and SEO ranking.

HOW TO ADD SITEMAP WIDGET TO YOUR BLOG

Login in to your blogger dashboard, Beside the blog you want to add the widget,click the dropdown menu (i.e that grey ▼beside the post icon). Click on PAGES then >> click on New page button, Select "Blank page" and write "Sitemap" as the title of the page while you can copy and paste this below code in the body.


 <script src="http://yourjavascript.com/30112272102/wilbersoft-sitemap-widget.js"></script><script src="http://YOUR BLOG URL HERE/feeds/posts/default?max-results=9999&alt=json-in-script&callback=loadtoc"></script>

Replace YOUR BLOG URL HERE with your own blog url and hit the Publish Button.

Congrats! You have successfully added the sitemap widget to your blog. Feel free to drop your
comments and ask us if you have a problem during added the sitemap in your blogger/blogspot enjoy.

Happy blogging.

Baca Selengkapnya ....

The Best ROM For Nexus 4 - PSX [ANDROID]

Posted by Unknown 0 komentar

This is the fastest ROM I have ever tried on my Google Nexus 4!
It is very quick, responsive and uses the latest Android 4.3 Jelly Bean.

Pure Speed Experiment has been specially optimized with performance in mind, so it is a very lightweight ROM with not so many features. Having said that, it still has some useful features.

Also, the ROM comes with the stock Google kernel so you can always flash a kernel of your choice to boost the performance even further! 

Not only is the ROM ultra fast, it is also very battery efficient.
Expect to get at least 4 hours of screen on time every time!

Official post and download links on XDA:


Baca Selengkapnya ....

Dungeon Hunter 4 - Nexus 4 - Gameplay - Highest Settings [Android]

Posted by Unknown 0 komentar

Dungeon Hunter 4 by Gameloft running on Nexus 4 on the highest settings.

Average FPS stays at 30 and a little less when in combat. I couldn't notice any major frame drops, so the game is very playable and runs good on my device.

Overall, this is an amazing game with great stunning visuals and challenging gameplay!
If you have a high end device, you definitely have to check out this game!

I just wish the game was more optimized for android devices, especially on Nexus 4.

This game can be downloaded for Free on Google Play store:
https://play.google.com/store/apps/details?id=com.gameloft.android.ANMP.GloftD4HM&hl=en


Baca Selengkapnya ....

How To Format a Flash Disk Drive of Using DOS Environment

Posted by Unknown Selasa, 27 Agustus 2013 0 komentar
How To Format a Flash Disk Drive of Using DOS Environment.

What is DOS? DOS Means Disk Operating System, is own by the microsoft coporation and was change the name to MS DOS Microsoft disk operating system.


Step to format A Flash Disk Drive in DOS Environment.

1. Insert the Flash Disk Drive in your computer.

2. Go to MyComputer.

3. Locate the flash name Either D: or E: depending on the name, the computer assigned to it.

4. Minimize the windows and go back to start button of windows menu.

5. Click at All Program Point to Accessory and Choose Command prompt on the list of menu that appears.

6. Type CD\Enter to change directory.

7. Type Format space the drive name follows with column and Enter key.


Example: Format E: Enter

8. Pressenter to continue.

9. Type Y on your computer keyboard.

10. Wait for a minute or seconds depending on the processing speed

11. After it reaches to100% the system will give you the drive analys is.

12. Type EXIT and go to MyComputer and you will see that your drive has been formatted.

That's all and enjoy dont forget to share it, to your friends also leave your comment if you have any problem.

Baca Selengkapnya ....

12 Years Hacker Detected A Hole In Google Translate

Posted by Unknown Minggu, 25 Agustus 2013 0 komentar

Mathias Kujala, 12, managed to crack a vulnerability in Google's translation system - as the search giant's own experts missed.
Seventh-grader could from his bedroom on Vendelsömalmsvägen outside Stockholm reveal a miss which could have serious consequences for ordinary users.
Now he has been rewarded with $ 3,000 from the company.
- I was very happy, he tells Expressen where the report was culled from


Baca Selengkapnya ....

Android's facebook UI on pc

Posted by Unknown Kamis, 22 Agustus 2013 0 komentar

Android like facebook UI on pc....:)

Now this time am not dealing with android... but something related to that, some of u like android's facebook UI a lot so there a trick how you can open facebook just like your android does.
its very simple to do. Just simply type in your url box
www.m.facebook.com
facebook link  this will appear somewhat like this
this it it...:)
thank u..
you can find me here google+

Baca Selengkapnya ....

How to Bypass Adf.ly Or Adfoc.us of Using JAVAScript Code

Posted by Unknown Rabu, 21 Agustus 2013 0 komentar
How to Bypass Adf.ly Or Adfoc.us


Many times mobile users struggle to bypass Adf.ly links because it stucks to 1-2 seconds and does'nt show “SKipAD” Button.

Let us used this Trick with OperaMini To Bypass Adf.ly or Adfuc.us.


How to Bypass Adf.ly Or Adfoc.us


To use this trick Just Create a New Bookmark in Your OperaMini Browser or any other browser with address and copy this JAVAScript in this blow box and PASTE it in the bookmark of your browser:


javascript:showSkip();

Save it with the name of "Adf.ly Killer" or any other name that you want, or you can simply paste it in the address bar when needed.

Now when ever you click any Adf link then simply open your "Adf.ly Kiler" Bookmark, It will start countdown from the second it was stucked. Open the bookmark again until it shows you “Skip AD” Button.

You can simply create a speed dial with the code (javascript) given above and whenever you open any Adf link in your OperaMini Browser, Simply click * +(plus) Your Speed Dial No.

                                                 READ THIS ALSO: How To Download Youtube Video Using OperaMini Or any Other Browser or Via PC

You Can Also Try It On Other Web Sites Which Stuck During The Countdown Using Opera Mini Browser to Skip or bypass it.

Hope this tutorial will help you let me know if its working for you, or you should drop your comment or problem that you have here.

Baca Selengkapnya ....

Top 12 Things To Do Before Applying Google AdSense

Posted by Unknown Selasa, 20 Agustus 2013 0 komentar
Google Adsense is the world’s most largest Ads Network and works at Pay Per Click system. It’s paying rates are better than all of other networks which is the biggest reason it is so popular to all Bloggers and Webmasters. But since everybody is running behind them, they have made the approval system very strict.You make little mistakes and get disapproved every time. So you need a complete guidance and list of thing that you need to do before applying for Google Adsense and supposing that you are ready to the Adsense.


Here Are The 12 Things Before You Applying Adsense

1. About Page:

An About has major role and importance if you don’t want to apply for Adsense. But when it comes to Adsense,they are about Zero chances of getting approved if you are not showing this page. About page simply describes about you and your Blog also. This will not only help you establish are lationship with readers but it will also make them trust upon you.

2. Contact Us Page:

It’s quite obvious that everyone has his/her own opinion. What one of your readers likes may be
bothering someone else. Than it is better to give them opportunity to speak up to you and tell how they feel about your Blog, what they want to be edited, what they liked or hated. It will also show the Google Adsense Team that is viewing your site that you actually care about your readers and not only the money and Adsense.

3. Privacy Policy:

One of the common mistakes that every Blogger makes and that I made many times before finally getting approved. Even though there are people out there who say that having a Privacy Policy for a Blog doesn’t makes sense but they are wrong. A Privacy actually describes to your readers about what they will get on your Blog,what they should do and what they should not. So obviously there is nothing bad in having a Privacy Policy. While it can affect some how on your Adsense Approval, you must give it a try. You can write it your self or find Privacy Policy Generators Online.

4. Age Verification:

I’m really laughing out typing this. Why? Because this is where I encountered a problem. Instead of 18, I accidentally published my age as 17 while on Adsense Application Form, it was accurately 18. Hence there started a problem. Because Google Adsense is not for under 18 people. I realized this also is a problem. So I advice you to be accurate while typing your age.

5. Name/ Email Verification:

Make sure to put you Name and Email address in some easily visible area like About Me and Contact Us pages. It will confirm to Google Adsense Team that it is the same person who applied for Adsense and not some spam.

6. Blog Design:

Your Blog Design is the biggest thing after Content. This represents your expertise, experience and Professionalism. So be careful because anything can kill your Chances.

7. Top Level Domain:


Those are gone far away when Adsense used to approved Blogspot.com and also with Wordpress.com Blogs. As for today, you must have your own unique domain that specifies your Blog. If you don’t have one yet, stop dreaming about getting approved with Sub domains and go buy a Top Level Domain. Another important thing about domain is it’s age. Because for most of Asian Countries, Adsense has placed an age restriction. They don’t accept any sites before they are 6 months old.

8. Content Type:

Be careful with what type of content you are publishing. Because it is something that truly matters. Google Adsense is not for Pornographic, Illegal Items, Drugs or other Blogs Sites like that. Also Adsense team won’t be willing to allow you to step in if you own a Non English Blog. Having posts shorter than 300 words in length is also Red Signal.

9. Paid Traffic:

Google hates the sites that are getting Paid traffic and mostly penalizes them so there is not a damn chance of getting Adsense Approval letter for a site that is getting paid traffic. You can bring traffic from Search Engines or any other way you want but if you want to earn via Google Adsense the right way, paid traffic is not a solution.

10. Providing Value:

Don’t complain about not making money and don’t clearly state that your are Blogging for Money only and have no other interest in it. Because this will show them that you will not be providing
values to your readers any day. Hence another Red Light glows up.

11. Other Ad Networks:

If you have any other Ads placed like addynamo.com, Clicks or some other AdNetworks like infolinks.com it’s time to drop them off. Even Google Adsense allow you to use other AdNetworks along with them, it’s better to remove the Ads before Applying and don’t put them back until you get a reply from Adsense Team.

12. Minimum Number of Posts:

There is no exact answer, Not even one because I have seen very established Blogs with 40,50 posts are enjoying making money. Exactly what I said that there is no actual answer.However, we can always predict things. According to my experience, you should only apply after you have more than good 60 quality posts. Posts length should must be 500+ words too.

Enjoy your Adsense if you've getting approved if not should try other AdNetwork that I mentioned in Number 11. And dont forget to leave your comment if you dont know something in this post.

Baca Selengkapnya ....

9 Solid Methods To Protect Email Account 98%

Posted by Unknown 0 komentar

1. Enable two step verification in you Email accounts.
2. Enable Login notification for you email and get notification in your mobile whenever you login.
3. Set a strong password with a mix of alphabets, numbers and special characters.
4. Enable login- notification for you Facebook accounts to prevent unauthorized access.
5. Enable HTTPS in your email settings and your Facebook account settings.
6. Always check your address bar for proper website address before logging in.
7. Setup a recovery question which is difficult to answer and never setup an easy & guessable answer to your security question.
8. Never click on any links sent through mail or chat. It may be a link which can steal your cookie or inject any viruses.
9. Never share your password with anyone. Even to your closest person.

Baca Selengkapnya ....

Download the New mp3 Song's By Sani Musa Danja

Posted by Unknown 0 komentar


This was another Hausa Song's by Sani Musa Danja.

The Tittle called: "Daga Allah Ne"

Download Hausa mp3 song by Sani Danja Daga Allah Ne

Here is another Song of Sani Musa Danja featuring Dan Indo.


The tittle of the song is: "Follow D Leader"

Download Now

Baca Selengkapnya ....

Facebook's Mark Zuckerberg Is Hacked

Posted by Unknown 0 komentar

Source: 360Hackers Group.
 Khalil, a Palestinian white hat hacker, submitted bug reports to Facebook about a vulnerability that allowed him to post on anyone's wall. But Facebook's security team didn't do anything. So Khalil wrote on Mark Zuckerberg's wall about it and was generally a badass.
Khalil explains on his blog that he submitted a full description of the bug, plus follow-up proof of its existence to the Facebook security feedback page, where researchers can win rewards of at least $500 for finding significant vulnerabilities. Then he submitted again. The second time he got an e-mail back that said, "I am sorry this is not a bug."

When he posted on Zuckerberg's wall, Khalil said, "First sorry for breaking your privacy and post to your wall , i has no other choice to make after all the reports i sent to Facebook team ." He then detailed the situation and provided links.

Within minutes, a Facebook engineer contacted Khalil for more information and then blocked his account "as a precaution" while a security team fixed the bug. Later his account was re-enabled. But Facebook says that he cannot claim a reward for the find because in hacking Zuck's wall he violated Facebook's terms of service. They commented that, "exploiting bugs to impact real users is not acceptable behavior for a white hat. In this case, the researcher used the bug he discovered to post on the timelines of multiple users without their consent." Facebook admits, though, that its team should have been more diligent in following up on Khalil's submission. So. Cool. Problem solved.

Baca Selengkapnya ....

How to Merge Profile Picture and Cover Pic on Facebook

Posted by Unknown 0 komentar

Go to the website and click on Merge profile & Cover photo.
The Website will ask you to upload a picture [Upload the picture that you want to merge]

After uploading the picture, select the part of the picture to your cover picture and click on DONE.

Then Click on the LIKE button of tricked out timeline or click on Already liked us?

Website will provide your profile picture and cover picture.

Baca Selengkapnya ....

Thousands Of Twitter Accounts Had Just Been Hacked By A Mauritania Attacker

Posted by Unknown 0 komentar
Mauritania Attacker leaked thousand of twitter Accounts credentials today, which was hijacked from twitter.
Reports from source made us to understand that as of now Mauritania Attacker have leaked about 15167 account details. but in a conversation with Techworm he confirmed that he have access to entire database of users on twitter and no account is safe from him, may be he will leak unlimited accounts credentials in the coming future.


The Account leaked are up for download on file sharing service of Zippyshare. All the account leaks are in plain text format.

The leaked data which contains twitter id, twitter nick name, oauth_token, and oauth_token, secret codes can be used to login into the victims account. Hacker also added how to use oauth_token to login into the Account -which can be done easily with the use of tamper data.
Twitter account holders are no more safe with their account as this computer geek is up for hard works


Baca Selengkapnya ....

Download WhatsApp Messenger(Latest Version) for Nokia s40,Symbian,Android,Blackberry and Iphone

Posted by Unknown Senin, 19 Agustus 2013 0 komentar

WhatsApp Messenger(Latest Version) Is a Smart phone messaging application that allow you to simply stay in touch with your friends in your phone contacts through exchanging of messages without having to pay for Sms.

It's across mobile platform and its also available for Iphone,Blackberry,Android and Nokia (s60v3,^5).

It make use of your data plan or if you does not have a Data plan they'll with your credit that's in your phone let drop the link here.

1. WhatsApp for Nokia s40 Java phone platform Asha models.


Download WhatsApp Messenger(Latest Version) for Nokia s40,Symbian,Android,Blackberry and Iphone


Download here for Nokia Asha S40
size:2.0mb

2. WhatsApp for Nokia Symbian phone s60v3,v5 symbian anna, symbian belle and symbian^3
Download WhatsApp Messenger(Latest Version) for Nokia s40,Symbian,Android,Blackberry and Iphone

s60 Symbian User should Download it here
size:5.0mb

3. WhatsApp for Android phone
Download WhatsApp Messenger(Latest Version) for Nokia s40,Symbian,Android,Blackberry and Iphone

Android User Download here
size: 10.1mb

3. WhatsApp for blackberry
Download WhatsApp Messenger(Latest Version) for Nokia s40,Symbian,Android,Blackberry and Iphone

Download from Blackberry Appworld

4. WhatsApp for Iphone
Download WhatsApp Messenger(Latest Version) for Nokia s40,Symbian,Android,Blackberry and Iphone

Download from whatsApp official site

Please leave your comment if you have any problem during installing it in your phone.

Baca Selengkapnya ....

Video Review Of The World's Best Selling Car

Posted by Unknown 0 komentar

It received the accolade thanks to a combination of sharp steering and handling.

With figure-hugging sports seats and ST badging throughout the cabin, the hot Focus sounds the part as well.

It has a 247bhp turbocharged petrol engine that takes the ST from 0-62mph in just 6.5 seconds

Another compelling factor is the Focus ST's price – a starting point of £21,995 makes it cheaper than many of its rivals.

We put the ST through its paces on our track – watch the video below.


Baca Selengkapnya ....

More than 100 Computer Key board Shortcuts (Microsoft Windows)

Posted by Unknown Minggu, 18 Agustus 2013 0 komentar
More than 100 Computer Key board Shortcuts (Microsoft Windows)


More than 100 Key board Shortcuts Keyboard Shorcuts (Microsoft Windows)

1. CTRL+C (Copy)

2. CTRL+X (Cut)

3. CTRL+V (Paste)

4. CTRL+Z (Undo)

5. DELETE (Delete)

6. SHIFT+DELETE (Delete the selected item permanently without placing the item in the Recycle Bin)

7. CTRL while dragging an item (Copy the selected item)

8. CTRL+SHIFT while dragging an item (Create a shortcut to the selected item)

9. F2 key (Rename the selected item)

10. CTRL+RIGHT ARROW (Move the insertion point to the beginning of the next word)

11. CTRL+LEFT ARROW (Move the insertion point to the beginning of the previous word)

12. CTRL+DOWN ARROW (Move the insertion point to the beginning of the next paragraph)

13. CTRL+UP ARROW (Move the insertion point to the beginning of the previous paragraph)

14. CTRL+SHIFT with any of the arrow keys (Highlight a block of text) SHIFT with any of the arrow keys (Select more than one item in a window or on the desktop, or select text in a document)

15. CTRL+A (Select all)

16. F3 key (Search for a file or a folder)

17. ALT+ENTER (View the properties for the selected item)

18. ALT+F4 (Close the active item, or quit the active program)

19. ALT+ENTER (Display the properties of the selected object)

20. ALT+SPACEBAR (Open the shortcut menu for the active window)

21. CTRL+F4 (Close the active document in programs that enable you to have multiple documents open simultaneou sly)

22. ALT+TAB (Switch between the open items)

23. ALT+ESC (Cycle through items in the order that they had been opened)

24. F6 key (Cycle through the screen elements in a window or on the desktop)

25. F4 key (Display the Address bar list in My Computer or Windows Explorer)

26. SHIFT+F10 (Display the shortcut menu for the selected item)

27. ALT+SPACEBAR (Display the System menu for the active window)

28. CTRL+ESC (Display the Start menu)

29. ALT+Underlined letter in a menu name (Display the corresponding menu) Underlined letter in a command name on an open menu (Perform the corresponding command)

30. F10 key (Activate the menu bar in the active program)

31. RIGHT ARROW (Open the next menu to the right, or open a submenu)

32. LEFT ARROW (Open the next menu to the left, or close a submenu)

33. F5 key (Update the active window)

34. BACKSPACE (View the folder one level up in My Computer or Windows Explorer)

35. ESC (Cancel the current task)

36. SHIFT when you insert a CD-ROM into the CD-ROM drive (Prevent the CD-ROM from automatically playing)

DIALOG BOX - KEYBOARD SHORTCUT

1. CTRL+TAB (Move forward through the tabs)

2. CTRL+SHIFT+TAB (Move backward through the tabs)

3. TAB (Move forward through the options)

4. SHIFT+TAB (Move backward through the options)

5. ALT+Underlined letter (Perform the corresponding command or select the corresponding option)

6. ENTER (Perform the command for the active option or button)

7. SPACEBAR (Select or clear the check box if the active option is a check box)

8. Arrow keys (Select a button if the active option is a group of option buttons)

9. F1 key (Display Help)

10. F4 key (Display the items in the active list)

11. BACKSPACE (Open a folder one level up if a folder is selected in the Save As or Open dialog box)

MICROSOFT NATURAL KEY BOARD SHORTCUTS

1. Windows Logo (Display or hide the Start menu)

2. Windows Logo+BREAK (Display the System Properties dialog box)

3. Windows Logo+D (Display the desktop)

4. Windows Logo+M (Minimize all of the windows)

5. Windows Logo+SHIFT+M (Restore the minimized windows)

6. Windows Logo+E (Open My Computer)

7. Windows Logo+F (Search for a file or a folder)

8. CTRL+Windows Logo+F(Search for computers)

9. Windows Logo+F1 (Display Windows Help)

10. Windows Logo+ L (Lock the keyboard)

11. Windows Logo+R (Open the Run dialog box)

12. Windows Logo+U (Open Utility Manager)

13. Accessibility Key board Shortcuts

14. Right SHIFT for eight seconds (Switch Filter Keys either ON or Off)

15. Left ALT+left SHIFT +PRINT SCREEN (Switch High Contrast either ON or OFF)

16. Left ALT+left SHIFT+NUM LOCK (Switch the Mouse Keys either ON or OFF)

17. SHIFT five times (Switch the Sticky Keys either ON or OFF)

18. NUM LOCK for five seconds (Switch the Toggle Keys either ON or OFF)

19. Windows Logo +U (Open Utility Manager)

20. Windows Explorer Keyboard Shortcuts

21. END (Display the bottom of the active window)

22. HOME (Display the top of the active window)

23. NUM LOCK+Asterisk sign (*) (Display all of the subfolders that are under the selected folder)

24. NUM LOCK+Plus sign (+) (Display the contents of the selected folder)

MMC COnsole Windows Shortcut keys

1. SHIFT+F10 (Display the Action shortcut menu for the selected item)

2. F1 key (Open the Help topic, if any, for the selected item)

3. F5 key (Update the content of all console windows)

4. CTRL+F10 (Maximize the active console window)

5. CTRL+F5 (Restore the active console window)

6. ALT+ENTER (Display the Properties dialog box, if any,for the selected item)

7. F2 key (Rename the selected item)

8. CTRL+F4 (Close the active console window. When a console has only one console window, this shortcut closes the console)

Remote Desktop Connection Navigation

1. CTRL+ALT+END (Open the Microsoft Windows NT Security dialog box)

2. ALT+PAGE UP (Switch between programs from left to right)

3. ALT+PAGE DOWN (Switch between programs from right to left)

4. ALT+INSERT (Cycle through the programs in most recently used order)

5. ALT+HOME (Display the Start menu)

6. CTRL+ALT+BREAK (Switch the client computer between a window and a full screen)

7. ALT+DELETE (Display the Windows menu)

8. CTRL+ALT+Minus sign (-)(Place a snapshot of the active window in the client on the Terminal server clipboard and provide the same functionality as pressing PRINT SCREEN on a local computer)

9. CTRL+ALT+Plus sign (+) (Place a snapshot of the entire client window area on the Terminal server clipboard and provide the same functionality as pressing ALT+PRINT SCREEN on a local
computer)

Microsoft Internet Explorer Keyboard Shortcuts

More than 100 Computer Key board Shortcuts (Microsoft Windows)


1. CTRL+B (Open the Organize Favorites dialog box)

2. CTRL+E (Open the Search bar)

3. CTRL+F (Start the Find utility)

4. CTRL+H (Open the History bar)

5. CTRL+I (Open the Favorites bar)

6. CTRL+L (Open the Open dialog box)

7. CTRL+N (Start another instance of the browser with the same Web address)

8. CTRL+O (Open the Open dialog box,the same as CTRL +L)

9. CTRL+P (Open the Print dialog box)

Enjoy and drop your comment..

Baca Selengkapnya ....

The New Blackberry R.I.M Considering the Sale of their Company

Posted by Unknown 0 komentar
Finally, after suffering a huge set back which is still going on, the Canadian firm Blackberry (formerly known as Research In Motion) has started making arrangement for the possible sale of the company.

The New Blackberry R.I.M


Their main reason being that the Apple/Android OS knocked them out of the biz and has been gathering a lot of crowd which by the negative smile of Lady luck, they have not been able to
compete against.

Even the Blackberry Z10 produced with a lot of capabilities launched early this year around January could not get them back on the Lane.

For we Nigerian who have BB as our best smart phone Ever because of the cheap subscription rate and for pinging sake, I wonder what will happen when and if this arrangement is concluded.

Whats do you want Say about this??

Baca Selengkapnya ....

MIGRATION CODES FOR MTN Nigeria Tarrif Plans

Posted by Unknown 0 komentar


MIGRATION CODES FOR MTN Nigeria Plans:

How To Migrate To MTN Super Saver Prepaid

•►To migrate to MTN supersaver, dial*408# or text
408 to 131

•►How To Migrate To MTN Nigeria Friends And Family:

•►To migrate to MTN friends and family, Dial*407# or text 407 to 131

How To Migrate To The MTN Nigeria Pulse:

•►To Migrate to MTN Pulse, Dial *406# or text 406 to 131

•►How To Migrate To MTN Nigeria Booster Monthly:

•►To migrate to MTN Booster Monthly, Dial*409# or text 409 to 131

How To Migrate To MTN Nigeria Booster Weekly:

•►To migrate to MTN Booster weekly, Dial*404# or text 404 to 131

How To Migrate To MTN Nigeria Smooth Talk:

•►To migrate to MTN smooth talk, dial*401# or text 401 to 131

•►How To Migrate To MTN Nigeria Talkon For free migration to MTN Talkon, Text 401 to 131

HOW TO MIGRATE TO MTN ZONE:


•►To migrate to mtn zone is very simple just dialthis code *135*1#

I hope this will help you guys...

Baca Selengkapnya ....

Simple Way to Publish a Blog Post via your Mobile Phone

Posted by Unknown 0 komentar
Since the introduction of the new blogger interface at the last two year's ago, it does not been easy for mobile bloggers to make a posts with thumbnails except they copy images from the internet and use it on their blogs. But this method of copying has its consequences.

To Get this Done, we will have employ the"Mail To Blogger"Post Method. If you already activated this method, Skip the next step, but if you have Not, follow all this simple steps to publish your blog post using your mobile device without a PC.

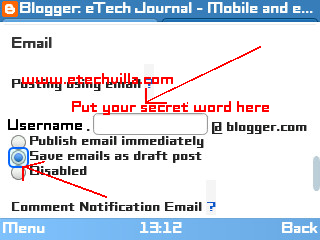
1. Goto Your blogger Dashboard, click on the blog you want to apply this method to, then Click on Settings => Mobile and Email then You will see a text area after your gmail username. In the text area, add a secret word which will be known to only you,select "save email as draft post" then Save the settings.

2. After you are done with the above step, goto your Gmail Account =>Compose a mail then compose the post that you want to publish.

The address you will send the post to is Your Gmail Username, like this SecretWord@blogger.com The Title of the post should be used as the Subject of the Mail and the Post content should be in the Mail Body.

3. Now is to Upload the Images you that want to use for your blog
post,use the mail attachment option to add the images you want to use, then send Mail.

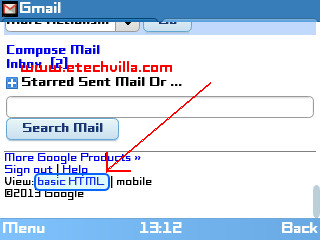
4. If you want to see the attachment option,Your Gmail Must be in Basic HTML to put your gmail in Basic html, goto the buttom of your gmail page and you will see it like in this image below.


5. Now Goto Your Blogger dashboard goto posts click on Draft, then You will find the blog post there, just edit it and arrange the images as you would like them to appear in your blog then click Publish.

Congrat your now success publishing a blog post via your mobile phone if your have any problem just write a comment to us, also share this post to your friends who love blogging tech.

Baca Selengkapnya ....

How To Root Tecno N3,D3 and T3 AndroidMobile Device

Posted by Unknown Sabtu, 17 Agustus 2013 0 komentar
Initially when tecno first launch its first android phone, i thought it would be a massive failure but i was proved wrong just like with their java phones. As i said, we have series of tecno android phones out there which include D3, T3,N3 and N7 happens to come with android ICS. Due to popular demand, am dedicating a trusted and safe way in which you can Root your Tecno N3 and T3 and tecno N7 on ics.

How To Root Tecno N3,D3 and T3 AndroidMobile Device


WARNING!
It is strongly advised that you use this tutorial only for the tecno phones specified above. Trying using this tutorial in any other Android device May result in unpleasant out comes of which am not liable. So before you proceed, Check your device’s model number in: Settings » About phone. Try this at your own risk. Although, it is very unlikely that your device will be damaged if you follow all the instructions here to the last letter in this tutorial.

Before You Root Your Phone Take Note Of This:

Once you have rooted your android device, your device warranty will get void; However, you can reclaim the warranty by applying official firmware update or by Unrooting the device.To check if you have successfully rooted your device or not simply Download and Install Root Checker it available on Google PLAY Store As you seen in this image below.

How To Root Tecno N3,D3 and T3 AndroidMobile Device


ROOTING Requirements:

1. Make sure your device have at least 80% battery power. How to Check Battery Percentage in Android Device press Settings » Battery.

2. Make sureUSB Debugging is enabled. You can do this by pressing Settings » Developer » Options » USB debugging.

3. Download Poot Tecno N3/T3 here also you can still download Ministro library fromGoogle Play Store or download the .apk of Ministro here

HOW TO ROOT YOUR TECNO N3,D3,T3 AND N7
Just install Poot Tecno N3/T3 downloaded from the above link to internal memory and run the application. It will require you to install theMINISTRO II you will get - error like “update minstro library”, just update through google play store or install the .apk (which you must have downloaded from the link above). » After installing and updating all the libraries of QT (about 10MB), your phone will automatically reboot (or reboot it manually) You will get two buttons.

1. "Press here to poot” 2. “Built in root check"

Click on the first button “press here to poot” and wait till you have 3 buttons (Get Superuser, Get Root-checker and In-built Root checker), That means you are now rooted. You can now complete the process by downloading the Superuser Application from the play store

WARNING: If your phone vibrate and goes blank try this another steps.

1. Enable usb debuging.

2. Change location of install
app to phone memory.

3. Uninstall poot.

4. Reboot N3 and reinstall poot.

5. Make sure you have a good working internet connection so as to update Ministro binary.

6. Restart your N3 after the update.

7. Unmount SD Card and run poot

8. Select the 1st option and wait. If pook display install superuser then u have sucessfully root your Tecno N3. If phone vibrate and goes blank then remove battery and put it back. Power On the phone, as soon as it shows installing SD Card quickly run poot and and press the first option.

Congrat your phone has been successful rooted if your have a problem just drop your comment or should CONTACT US

Baca Selengkapnya ....

You Can Run Android Apps on PC -See Steps

Posted by Unknown Jumat, 16 Agustus 2013 0 komentar

  1. You'll need to download the latest version of Bluestacks
  2. Install the downloaded software. 
  3. The Bluestacks App Player will need to connect to the internet to download its core files... Wait till it's done. 
  4. You can now search for your desired apps on available markets (Google Play is recommended) through its search bar. [To download from Google Play, you'll need a Google Account]
  5. Complete the app installation. 
  6. Then run it. Done! 

Baca Selengkapnya ....

More about android

Posted by Unknown Selasa, 13 Agustus 2013 0 komentar

Want to know more about your android


01 Use the Filmstrip view
While browsing your photos, pinch on a single photo to bring up a filmstrip-style view that makes it easier to flick between your images.
02 Apply custom crop
Go to the Crop feature within the Gallery app and locate the small menu at the bottom that lets you choose a crop template to use.
03 Take pictures while recording
As you record using the video function on your device, long-press on your screen and you can take a photo of that frame for safe keeping.
Hidden menus and more
04 Edit personal dictionary
The stock Android keyboard has a limited dictionary, but you can add words to it by going into the Personal Dictionary folder within the Language & Input menu. Add as many words as you like – or know!
05 Track your battery usage
Press on the graph in the Battery section in your Settings app to uncover a more thorough and comprehensive graph listing, showing how your phone battery is being used.
06 Solve sudokus with Goggles
One of the coolest features in Google Goggles is something you wouldn’t expect an app to do. Simply use the app to take a picture of a sudoku puzzle and the app will finish it for you.
07 Beanflinger Easter egg
Long press on the Android version number in your Settings application to see the hidden Beanflinger screen.
08 Avoid delivery reports
Depending on your network, delivery reports can cost you 1p for every time you send a text message. To disable them, go to your message settings and find the Stop Delivery Reports option and enable that. To check if it has worked properly, it’s best to check your phone bill at the end of the month.
09 Reboot to safe mode
Need to rid your phone of malicious software? No problem. Long press on your power button and on the Power Off tab that appears. You can now choose to boot your phone up in safe mode.
10 Add faces to Face Unlock
You can add several faces to the Face Unlock feature to make sure it recognizes you when you try to unlock it. Particularly useful if you’re prone to growing a beard! ( still you can unlock with a photo of that person...!! ;))
11 Offline voice input
You don’t need to be online to use the voice search function on your phone or tablet. Go to Settings>Language & Input>Voice Search and select Download Offl ine Speech Recognition.
12 Filter your app content
There are over 675,000 apps on the Play store and some of them aren’t suitable for younger users.
To block them from your searches, go to the Play store’s Settings page and edit the Content Filter list.
13 Secret keyboard symbols
Long-press on a specific letter on your keyboard to add accents to it.
14 Top secret dialing codes
Built in to the Android OS are a series of dialing codes that when entered will activate a number of hidden features and settings that you can take a look at on your phone. To get them to work, type them exactly as you see below, and wait a few seconds for the outcome to appear.
Note: Not all dialing codes work with every device.
*2767*3855# – Hard reset your phone
*#*#1472365#*#* – Quick GPS test
*#06# – Displays IMEI number
*#*#34971539#*#* – Shows complete information about your device’s camera
*#*#526#*#* – Wi-Fi tests
*#*#4636#*#* – General phone information
*#*#1234#*#* – Firmware information
*#*#0842#*#* – Vibration and backlight test
*#*#44336#*#* – Displays build time and changes list number
Do More With Google Maps
15 One finger zoom
Double-tap, long-press and then slide your finger up or down to zoom in and out within a Google Maps view.
16 Find your Location history
Find the Location history tab in Maps’ main menu to see your most visited places.
17 Get a quick address
Long-press on a building or road to see the exact address and post code.
18 Invite friends to Latitude
Connect Google Latitude to your Facebook account and see where your friends are going.
19 Alternate driving directions
See different driving paths in Navigation to help avoid traffic and road works.
20 Developer options in Android 4.2
In previous versions of the Android OS, the Developer options menu has come as standard, but with Android 4.2 the menu seems to be missing. The menu can be retrieved with a bit of digging, however.
Go to Settings>About Phone and find the tab listing the build number of your device. Make seven short presses on this tab to bring the Developer options back to your Settings menu for you to use whenever you need it. All the settings and toggles within this menu are the same as they were in previous OS versions.
21 Simple settings toggle
The new settings window is a great way of gaining access to some of your most commonly accessed menus and settings. You can make the process of altering some of the settings listed here even quicker, however. By longpressing on the Wi-Fi, Bluetooth or Aeroplane mode buttons, you’ll be able to instantly turn them on or off without ever needing go into the actual menu. The only limit to this feature is that you’ll be unable to choose the Wi-Fi network you connect to, so for that, you’ll need to venture into the appropriate menu.
22 Update apps on different Google accounts
You could have a series of Google accounts for many reasons, but trying to keep the downloaded apps on each of them updated can be a difficult and time-consuming project. A great way to quicken the process up is by going into the My Apps section of the Play store, navigate to the Update tab and select a different email account from the menu provided. This menu lists each app that has been installed on each device and you can choose which apps to update.
23 Swipe-to-delete gesture in Gmail
The Gmail service has recently undergone a massive update and there’s now a whole host of features to uncover. One of the biggest features, and one that was desperately wanted by the Android community, was a new way of quickly deleting messages from your inbox. By simply swiping to the right on the email
you want to delete, it will now automatically be placed in your Deleted folder. On top of this, there’s also a new menu in Gmail’s settings to alter what the swipe function does.
Tweak Chrome For Faster Browsing
24 Full screen browsing
Type ‘chrome://fl ags/’ in the address bar and enable the WebGL option. Then go to http://bit.ly/10QfLqM and select Start Experiment to begin your full screen browsing experience.
25 Enable auto-fill
One of the new features in Chrome is being able to use auto-fill on any emails and passwords you use. Find the Auto-Fill option within the Sync folder in Chrome’s Settings.
26 Find data savings
Type ‘chrome://net-internals/’ into the address bar to open up some advanced settings.
Scroll down and choose the Bandwidth option to see how much data you’re currently saving.
27 Pro features in the Calendar app
One of the most overlooked apps that comes as standard on most Android devices is the Calendar app. As well as being a simple way to keep track of appointments and important dates, there are plenty of additional features buried within the app that you can also use. The latest update to the Calendar enabled users to put together their own interactive notifications that can display appointment details on. If you’re an avid Calendar app user you can look up previous entries to mimic them and create the same notification as before, which is a massive help if trying to create lots of entries at the same time.
Finally, by long-pressing on a date, you’ll be able to create a new entry using the month view mode.
28 Rename Wi-Fi hotspot
The Wi-Fi hotspot feature is great for sorting out pesky internet issues and connecting your non-3G devices to the internet. Although the Wi-Fi hotspot is a well-known feature, by opening up the settings page relating to your hotspot, you can rename it to a name that suits you while also customizing the password needed to connect to it.
29 Use 2G only
3G is a massive drain on your battery life, so to help save some precious minutes, turn on the Use 2G Only option within the Settings menu. Although your connection will be slower, it will certainly save you precious battery life.
30 Full screen movies
While watching a movie in the Play Movies app, press on the screen symbol located in the top-right of the app to play the movie in full screen mode. That way you make better use of your device’s extra  screen real estate.
31 Stop screen from sleeping
Having your screen turn itself off while you’re using it can be an annoyance, but it’s an easy fix if you look in the right place. Choose the Stop Screen from Sleeping option within Developer options to disable it.
32 Show RAM usage
Open up the Apps menu within your Settings and scroll across to the Running tab. Press on the Show Cached Process button found in the top-right of the app to see a display of where your RAM is being used.
33 Change your spell checker
Navigate to the Language & Input section of the Settings menu and find the Keyboard section within. From this menu you can find details about your spell checker and customize the language you want it to recognize.
34 Shortcuts for contacts
Instead of filling your various home screens with widgets, why not create a shortcut of your most  contacted numbers on your device instead? Open up the Contacts app and longpress on a contact’s name to add a shortcut of them directly onto your home screen.
35 YouTube as a second screen
One of the best things about the default YouTube app is being able to connect it to your PS3 and Xbox 360 accounts. When you then use the YouTube app on either console, you can control it using the  layback controls on your phone or tablet.
follow me onAditya Singh


*Android 5.0 Key Lime Pie Features

1.Google Babble:
This is one of highlighting feature of Android 5.0 Key Lime Pie,which is basically a messaging service which will target to unify various messaging, talk, chat, voice and hangout services.Also there is rumour about the Google game hub ;)
2.Keyboard:
Android 5.0 Key Lime Pie version now will give you a more smoother experience of typing.We have seen other companies have a upper hand in this since they provide variety of features such as swipe keyboard etc which is missing in Google devices but this will be available with 5.0.Also a smart feature of Clever Line Drawing app will be there so as to use keyboard with improved manner.
3.Message Clouding Storage:
There is problem mostly encountered by those person who constantly change there SIM  is that whenever you change your sim or device the only thing which left behind is messages but now with Android 5.0 Key Lime Pie you have an advantage you can store or have backup in your Gmail account so that you can’t loose even a single message.So for a constant swapper this would be a new and advantageous thing.

4.Shutter Speed Control:
Till now we have noticed any android device haven’t been able to match the devices like apple iphone & Nokia Lumia in case of shutter speed.Since every company provides different sensors which actually brings the difference and speed becomes slower but this time with 5.0 we are hoping they will bring end to this problem and we have good shuttering speed.
5.Performance Profiles:
Now the user demand a phone who could work according to his/her moods that is user wants to have different profiles with different occasion let say if its day time user demand more brightness and if it night user want less brightness & no unwanted calls so Android 5.0 Key Lime Pie allows user to set profiles.
There will be other option of setting profile such as if user want to have more power profiles for playing games user can set accordingly and widget will be there i.e. power strip style for phone to perform profile function for easy access.
6.Camera and Video Chat App:
There is a software from Samsung which allows user to create a Panoramic photo across 360 degree but this option will be available for Samsung users after all this software is from Samsung.The video chat option is missing in earlier devices but Android 5.0 Key Lime Piewill provide you an application which will help you to video chat with your friends.
7. Multi Device Support:
Now the switching would be much easy between your Tablet and Smartphone and also users will have a option to be better connected with play store that is if you buy an app from Google play store it can be downloaded on your other devices as well.
8. Multi Selection
If you have noticed you can’t select more than one contact while messaging and sending email which sometimes is strenuous so as to end this problem with Android 5.0 Key Lime Pie you can be able to choose more than one contact so as to send contact to more persons.
9. Never Update
More of the times its very annoying to get the notification about of this and that app so as to remedy this problem now you will have a option to automatically update hence no manually need to update the app

*Android 5.0 Key Lime Pie Release

Yet its not officially announced when this version will be shipped with the devices but sources claims that this will unveil its new version by the end of the October or in first week of November.
I am looking forward to see this version and i guess you all too.We know android devices suffer from hardware problem,keeping finger cross and hope this new software comes up with deadly mobile beast ;)
If you like this article please share it using social media with your friends and Keep visiting
Thanks
Baca Selengkapnya ....
Trik SEO Terbaru support Online Shop Baju Wanita - Original design by Bamz | Copyright of Android rush.