Tampilkan postingan dengan label Blogging. Tampilkan semua postingan

Simple Way to Make Money Online From Feverr

Posted by Unknown Sabtu, 23 November 2013 0 komentar
Make Money Online From Feverr


Everyone know that micro job sites are good platform for freelance work. But many people make certain
mistakes while creating gigs or services. In most cases majority of the people don’t have the clear idea about the working of these sites or how to start a service (GIG) on thus sites. So here on Kudantown blog we are going to help you to solve this issue & helps to make unlimited money from these micro job sites. Here we briefly explain procedurse and what are the important things to remember when starting a gig and after the creation of gigs etc.


What is Fiverr? In simple words fiverr is a micro jobs platform where you could offer your service called as gigs.According to the latest version of fiverr you could earn up to $5 – $100 per sale. Don’t go to imaginations,stick here. Fiverr will took some percentage of your earnings.For an example if you got a job for 5$ fiverr will took $ 1 & you will get $4 in your wallet.How nice is that.If your service is unique you could earn as much as you want.


1. If you are a Newbie Sign Up with Fiverr now, t’s really 100% free . You can join with fiverr using your email or with your existing facebook account.I suggest to choose the right User Name according to your service (gig) taht your going to offer on fiverr.


2. Complete Sign up process on Fiverr,Check your mail inbox for Verification email. This is only for to avoid spamming,only took 1 – 2 minutes of your time. Verify Your Fiverr Account.

How  to Make Money Online From Feverr


3. After verification You are Automatically redirected to profile page.Profile page consist both account setting and public profile settings,Here you can adjust your complete profile setting. Fill your full name email
address in then given column.


4. Fiverr Account Settings Page : Next is public profile setting. Here Upload an appropriate photo that suitable for your profile. Write some description about you in the SOME THING ABOUT YOU box. Write your key skills, Experience etc in this page.

5. Public Profile Page Settings : After completing profile information we can create our first gig. To create gig click on START SELLING link on top right side of your current page, Then you can see this window,Then Click on CREATE A GIG.

6. Create Your First Gig : This is the main page of gig creation usually many people makes mistakes here after completing previous steps.due to this reason majority of newbie sellers are leaving fiverr, this is because lack of knowledge,so here i briefly explain and solve your problem regarding gig creation.


  • GIG TITLE Select / create a title fo your gig of maximum 80 char long. Title always needs to be unique,try to write in your own words. Try to create title as much as attractive.


  • CATOGORY Select category suitable for your gig. If your gig is about article writing then select WRITING & TRANSACTION. Select sub category CREATIVE WRITING & SCRIPTING.


  • GIG GALLERY Gig gallery is for uploading picture that are related to our gig. Upload samples of your work in image format it will help you to get more buyers.


  • DESCRIPTION Here you describe the detail of your service your key skills,Experience in given field,Other benefits / advantages etc in maximum 1200 character. Description always be unique.


  • TAGS Add tags (KeyWords) closely match with title you can find Keywords from fiverr it self,just look at other service provider offering similar service that you have.


  • DURATION Set maximum time period needed for completing work.


  • INSTRUCTIONS FOR BUYERS In this field seller clearly write about the requirement needed to complete work. Finally click on SAVE AND CONTINUE.


7. Create Gig : You can add Video to improve gig visibility among thousands of gigs.

Add Video Finally you can see your gigs in my gig page. you can delete and edit gigs from this page. To get more buyers share your gigs in social networking sites,forums etc.

You can also like our Facebook fan page or simply Join our facebook group for more latest news tips and trick.

Baca Selengkapnya ....

how to create a profesional Logo for website and blog using Adobe photoshop

Posted by Unknown Rabu, 13 November 2013 0 komentar
how to create a profesional Logo for Your website and blog using Adobe photoshop


Header Image In this tutorial i will tell you how to make the blogger header image. This is so simple but for this you can properly command on the Photoshop. If you know Photoshop then you can easily make all type of image and according to your blogger post and best image working with your own mind. If you are trying to make image to your blogger header or like Favicon then you are follow these steps.

If your not know how to run Photoshop then don't worry i will help to making this type of image to learn you all features of Photoshop you can not go any way all the tips and trick are available in few days.

If you also learn how to run Photoshop then keep watching my site to next post.

You can also WATCH this video tutorial on how to create a profesional Logo for website and blog using Adobe photoshop its very simple an easy.


Now Let Get Started with the First Step:

If you have Photoshop any type like Photoshop 6.0 or Photoshop 7.0 like these you can make easily to you blogger header image in these Photoshop.

  • Run Photoshop on your Screen.
  • Go to File on top of your Photoshop software.
  • Click New (You can also use CTRL + N as a shortcut key).
  • Select your Header Image size which you want like my header image size is 700x90. Select it width and height like my header width is 700 and my header image height is 90. You make your own choice image.
  • Select your Mode like RGB Color, Gray-scale, Bitmap.
  • Select your Content Like White, Background Color Or Transparent.
  • Select your Color of Your header image. When you Selecting header image color then what you want its depend upon you it you want single color then only click your favorite color ad if you want to choose multiple color then go to gradient tool. First you can get command on simple image make.
  • Now make title of your Blogger like my blogger title is "Trick of Blogging" its up to you.
  • Select your title color different types and shape. Many title shapes and fonts are available in Photoshop. You can manage easily your title fonts.
  • To write your title to You can go to Type Tool Like [T] and then write your title.
  • Now Go to blending option to make the title 3D type.
  • This 3D type option available in layer which is on your right sidebar.
  • If you have not option of layer in your right sidebar then you can go to window on your adobe Photoshop software on the top of your Photoshop and then go to number 14 Show Layers.
  • Then Go to layers and right click on your text and in layers. Go to Blending Option you can easily manage all changes.
  • Now last step on Photoshop you can save your image in JPEG format on your computer.
  • Now go to Blogger.com and Login you blogger.
  • Go to Header Gadget and select the image from your computer and then upload in your blogger header image and select the option written below select image instead of title and description.
  • Then save the Gadget and back to blogger.
  • Save Changes also.
  • Check your blogger header with the link view blog.

You can also join our facebook group for more lates tutor or Like our fans page for our daily update. Dont forget to drop your comment and hit share to your friend.

Baca Selengkapnya ....

How to publish/syndicated your blog post automatically to the social network sites using networkedblogs

Posted by Unknown Sabtu, 26 Oktober 2013 0 komentar
publish/syndicate your blog post automatically to social network sites using networkedblogs


Syndication tells NetworkedBlogs where you want your new blog posts to be posted in Facebook (and NetworkedBlogs can automatically tweet your new post,too). Syndication is a great tool to help you automate sending your blog content to Facebook and Twitter. To set up your syndication,follow these steps:

publish/syndicate your blog post automatically to social network sites using networkedblogs


1. Log in to NetworkedBlogs.

2. Click the Blogger Dashboard link in the top-right corner of the NetworkedBlogs application.

3. If you’re using the application for the first time,click the Grant Permissions button.

publish/syndicate your blog post automatically to social network sites using networkedblogs


A pop-up window appears,asking you to allow the NetworkedBlogs app to post on your behalf and access your data. This request can look daunting,but the app is reputable.


4.Click Allow. You will see your Blogger dashboard.

5.Click Syndication in the left sidebar. You see a drop-down menu with your blog and the places you want to send your post listed.


6. From the drop-down menu,choose the blog you want to configure.

7. Add Facebook targets and your Twitter targets. You can also customize the post by clicking the Customize Post button at the bottom of the Syndication page. You can specify whether to include an image. You can also choose whether you want to hide the NetworkedBlogs toolbar when people navigate to your post from the NetworkedBlogs link. The toolbar can make it easier for people to share,but the choice is up to you.

You've done with all the steps. You can also like our faceebook fan page or join our facebook GROUP for more usefull update.

Baca Selengkapnya ....
How to Add stylish social media widget to your blog

Posted by Unknown Jumat, 04 Oktober 2013 0 komentar
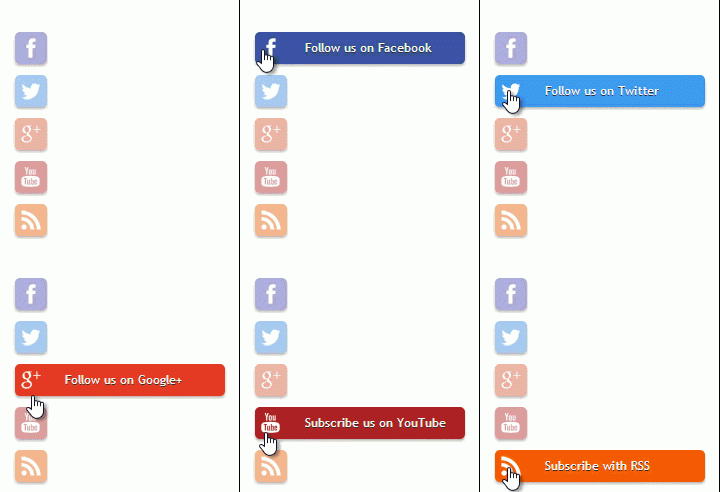
Another wonderful social media widget,In this article I want to  Explain How To Add Awesome-Best Style Social Media Widget for your Blogger. By Using This bst Style Social Media Widget to your Blogger You Can Link Your Social Media Profile Facebook, Twitter And RSS and also with Google Plus And Pinterest.

You can Check here in This Below image.

How to Add stylish social media widget

FOLLOW THE STEPS BELOW:

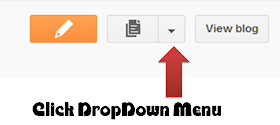
Now login to your blogger account and then click on the drop down menu like you see in the image below.

How to Add stylish social media widget

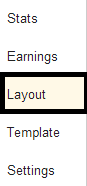
Then click on Layout indicate in the below.


How to Add stylish social media widget

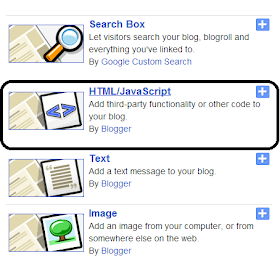
Now locate and on HTML/JavaScript,then click on this plus + 

How to Add stylish social media widget

Then Copy and Paste this below code in the HTML/JavaScript:

<style>
.StarsBloggingSocialButtonsBorder {
margin:0 auto;
padding:5px;
width:auto;
border-radius:5px;
border: 1px #BBBBBB solid;
}
#bloggertrix-SexySocialButtons{
list-style:none;
text-decoration:none;
font-size:0.9em;
font-family:trebuchet ms,sans-serif;
}
#bloggertrix-SexySocialButtons a{
text-decoration:none;
font-family:trebuchet ms,sans-serif;
}
#bloggertrix-SexySocialButtons li{
position:relative;
height:38px;
cursor:pointer;
padding: 0 !important;
}
#bloggertrix-SexySocialButtons .facebook, .googleplus, .YouTube, .rss, .twitter{
position:relative;
z-index:5;
display:block;
float:none;
margin:5px 0 0;
width:210px;
height:38px;
border-radius:5px; background:url(http://1.bp.blogspot.com/-JKq0eFFwx34/UGx39fhHO_I/AAAAAAAABE4/56i9phAS2do/s1600/NBT+Sprites+Social+Icons.png) no-repeat;
background-color:rgba(217,30,118,.42);
-webkit-box-shadow:rgba(0,0,0,.28) 0 2px 3px;
-moz-box-shadow:rgba(0,0,0,.28) 0 2px 3px;
box-shadow:rgba(0,0,0,.28) 0 2px 3px;
color:#141414;
text-align:left;
text-indent:50px;
text-shadow:#333 0 1px 0;
white-space:nowrap;
line-height:32px;
-webkit-transition:width .25s ease-in-out,background-color .25s ease-in-out;
-moz-transition:width .25s ease-in-out,background-color .25s ease-in-out;
-ms-transition:width .25s ease-in-out,background-color .25s ease-in-out;
-o-transition:width .25s ease-in-out,background-color .25s ease-in-out;
transition:width .25s ease-in-out,background-color .25s ease-in-out;
-o-box-shadow:rgba(0,0,0,.28) 0 2px 3px;
}
#bloggertrix-SexySocialButtons li:after{
position:absolute;
top:0;
left:50px;
z-index:2;
display:block;
height:38px; color:#ffffff;
content:attr(data-alt);
line-height:32px;
}
#bloggertrix-SexySocialButtons .icon{
overflow:hidden;
color:#fafafa;
}
#bloggertrix-SexySocialButtons .facebook{
width:32px;
height:32px;
background-color:rgba(59,89,152,0.42);
background-position:0 0;
}
#bloggertrix-SexySocialButtons .twitter{
width:32px;
height:32px;
background-color:rgba(64,153,255,0.42);
background-position:0 -33px;
}
#bloggertrix-SexySocialButtons .googleplus{
width:32px;
height:32px;
background-color:rgba(228,69,36,0.42);
background-position:-3px -66px;
}
#bloggertrix-SexySocialButtons .YouTube{
width:32px;
height:32px;
background-color:rgba(174,45,39,0.42);
background-position:-2px -95px;
}
#bloggertrix-SexySocialButtons .rss{
width:32px;
height:32px;
background-color:rgba(255,102,0,0.42);
background-position:-3px -126px;
}
#bloggertrix-SexySocialButtons li:hover .icon,
.touch #bloggertrix-SexySocialButtons li .icon{
width:210px;
}
.touch #bloggertrix-SexySocialButtons li .facebook, #bloggertrix-SexySocialButtons li:hover .facebook{
background-color:rgba(59,89,152,1);
}
.touch #bloggertrix-SexySocialButtons li .twitter, #bloggertrix-SexySocialButtons li:hover .twitter{
background-color:rgba(64,153,255,1);
}
.touch #bloggertrix-SexySocialButtons li .googleplus, #bloggertrix-SexySocialButtons li:hover .googleplus{
background-color:rgba(228,69,36,1);
}
.touch #bloggertrix-SexySocialButtons li .YouTube, #bloggertrix-SexySocialButtons li:hover .YouTube{
background-color:rgba(174,45,39,1);
}
.touch #bloggertrix-SexySocialButtons li .rss, #bloggertrix-SexySocialButtons li:hover .rss{
background-color:rgba(255,102,0,1);
}
</style>
<div class="bloggertrixSocialButtonsBorder">
<ul id="bloggertrix-SexySocialButtons">
<li data-alt="Follow us on Facebook"><a class="icon facebook" href="https://www.facebook.com/symbiangurus">Follow us on Facebook</a></li>
<li data-alt="Follow us on Twitter"><a class="icon twitter" href="https://twitter.com/abubakarkudan">Follow us on Twitter</a></li>
<li data-alt="Follow us on Google+"><a class="icon googleplus" href="https://plus.google.com/116319346499618290186">Follow us on Google+</a></li>
<li data-alt="Subscribe with RSS"><a class="icon rss" href="http://feeds.feedburner.com/kudantown">Subscribe with RSS</a></li></ul></div>

Dont forget to Replace the all HighLighted Red With Your own Facebook ID/Username,Twitter Username,RSS and also with your Google Plus ID.

Then click on 'Save' you've Done now view your blog and see how it will appear and enjoy blogging.

Baca Selengkapnya ....
How To Publish Your Blog Feedburner Feed To Twitter Automatically

Posted by Unknown 0 komentar
If you’re a twitter freak with thousands of followers,you will surely like to tweet every blog post immediately they will appear on your blog.

Feedburner does this for you at no cost and I assume you already have a google account as this is what you’re going to need to login to the Feeburner.

I also believe you have your blog RSS feed. This is how to get your blogspot RSS feed address if  you do not know it already.

How To Publish Your Blog Feedburner Feed To Twitter

Your post RSS feed should be look like this:
http://kudantown.blogspot.com/feeds/posts/default

Your comment RSS feed also should be like this:
http://kudantown.blogspot.com/feeds/comments/default

NOTE : Dont forget to Replace kudantown.blogspot.com with your own blog’s address.

Now login to feedburner.com and burn a feed. Use your post RSS and do the necessary configuration.

Also when your feed is ready,follow the below simple steps:

  • Click on “Publicize”
  • Select “socialize” from the links on the left.
  • Add your twitter account with your username and password
  • Grant Feedburner the required access to your twitter account.
  • “Save” and the service is now been active.


Once if this is done, every blog post you make will appear to your twitter followers as a new tweet. You can get a lot of traffic from social networks if you know the right way to utilize them.

Dont forget to drop your comment and hit the share bottom to your friends also Like our Facebook Fans page for the daily update.

Baca Selengkapnya ....

How To Create Your Own blogger/blogspot website

Posted by Unknown Kamis, 26 September 2013 0 komentar
There are several services that offer free blogs to any one who wants. The most popular services or blogging service are WordPress.com and Blogger.com,although a Google search for “free blog” turns up over 150 million sites — surely there’s one that meets what ever crazy needs or desires you have.

Create your own blogspot

Now Let Me Get Started For The Newbie:

1. Sign up for an account at Blogspot.com. Your blog will be as my example like this "username.blogspot.com" or "yourdesirename.blogspot.com" and continue,also you check Top 10 Best free blogging platforms you'll see the best free blogging platforms.

2. Select a template that you want appy. There are lots of great blogger template designer to choose from various designer. Or you can go with the blogger default template.

3.Then you can now Start posting. Have a look at the site in just under 5 minutes just like this: www.kudantown.blogspot.com

  • Being a Blogger: OK, now you have a blog. What are you going to do with it? The stereo type of bloggers is that we post about our cats and what we had for lunch, but the reality is that there’s bloggers out there writing about every conceivable topic.


  • Your blog is only limited by your passions — what do you have to say? Think about what purpose you want your blog to serve — do you want a record of your daily life, or maybe a way to keep friends and family up-to-date while you’re traveling? Or maybe you want a place to promote your writing, music, or artwork and to keep in touch with your fans? Maybe you want a channel to communicate with your customers — and where they can communicate with you? Perhaps you want to share your insights on politics, freelancing, soccer coaching,high school teaching, or fishing with the world?

  • There are a few things you should know about writing a blog, though. While there are examples of every conceivable style of writing on blogs across the Web, there are a few qualities which blog writing tends to share:

  • It’s short: Reading on the screen isn’t as enjoyable as reading on paper, so people tend to shy away from really long pieces. 2,000 words is long for a blog post; 1,000 words is a pretty good goal; short pieces of 300 words or so are perfectly acceptable.

  • Paragraphs are shorter: Because you have to scroll a lot when reading on a screen,paragraphs tend to be shorter so a whole thought can fit in a browser window.

  • Important points are highlighted: Online readers tend to skim through pieces, so web writers often put key points in bold type so their readers can easily pick out the crucial stuff.

  • Bulleted lists are common: Bulleted lists are another way that skimmers are a ccommodated,making all the main points easily.

  • It contains links to other sites: Blogging tends to take advantage of the ability to link to to her work, either to offer up references (e.g. a link to a definition of a difficult word or concept on Wikipedia) or to continue conversations started else where (e.g. a link to a post on another blog which you’re responding to).

  • It’s conversational in tone: Blog writing tends to be a little more personal than most writing. What readers tend to respond to is the writer’s unique voice, their personality as expressed through their writing. That means you can use “I” and “you”, you can use slang, you can even swear if it fits your site’s purpose. All of these “rules” are, of course, broken repeatedly.

  • There are millions of blogs on the Internet, but only a tiny fraction of them are active. There are a number of reasons why blogs “die” — people run out of things to say, they get busy, or worst of all, they feel like they’re talking to themselves. Here are a few tips to help you keep your blog up and read:

  • Create a posting schedule: When you start your blog, commit to posting once a week, or once every two weeks, and block out some time in your schedule to do that. Start with a low posting rate — if you find you have enough time to post more, it will be a pleasant surprise for your readers (as opposed to the disappointment of readers used to seeing you post every day when you start posting every two weeks).

  • Brainstorm a hundred post ideas: Sit down with a notebook and write out a hundred (or 50, or 200, or what ever you can — but set the bar high) topics you could write about. Even better,create 100 titles of forth coming posts. You can even go another step and write quick outlines of how the post might look, When you are stuck for something to write about, pull out your notebook and write one ff your list.

  • Write posts in advance: Build up a backlog of three or four (or more) posts. This gives you a cushion in case you find yourself stuck for a topic down the road, and you can also use the post scheduling feature several blogs have (WordPress.com and Blogger.com both allow this) to set up posts for the future if you are going to go on vacation or something.

  • Tell people your address: Let people know you have a blog. Put the URL on your business cards, add it to your email signatures, put it in your profile on social networking sites,include it when you post to forums,and so on.

  •  Comment on other people’s blogs: Be an active part of the blogging community. People will see your comments and click the link to find out more about you. Plus, you’ll make friends in your area of interest.

  • Link to other blogs: When other bloggers see you’ve linked to them, they’ll check you out — and may link back to return the favour.

  • Write a guest post: Lots of high-profile blogs will publish guest posts from other bloggers to help them get some attention. Check your favourite blogs and see if they have information about contributing — if you can’t find any thing, email the blogger and ask.

  • Write great content: I’ve saved the most important thing for last. Nobody will read your site if you write poorly, or if it’s boring. Nobody will publish your guest posts,and nobody will link to you. You won’t feel motivated to write,because you’ll feel like nobody is reading you, and because you feel unsatisfied with the quality of the work. You don’t have to be Heming way,but you do have to develop an authentic, engaging voice.
Ready, To set Your blogger/Blogspot:
In the time it’s taken you to read this post, you could have set up a blog and published three 300 word posts already. It’s easy, it’s fun, and if you play your cards right, it could make you some money. Not just because you can put ads up or sell products using a blog (though you can do both of those things) but because a blog gives potential employers, clients,and customers a way to find out more about you and to build a relationship with you or your company that’s more human
(and humanizing) that the simple exchange of dollars for products.

Baca Selengkapnya ....

Top 5 Simple Tips To Design A SEO Friendly Website

Posted by Unknown Sabtu, 21 September 2013 0 komentar
5 Simple Tips To Design A SEO-Friendly Website

1. Search engine friendly naming conventions for all your pages. The naming convention for every page should be search engine friendly. It is best to place important keywords that you wish to optimize as your naming convention. Just make sure that it is relevant to the content of the page. Separate words by using (-) such as "search- engine-optimization.html" so as to facilitate crawling.

2. Do not build your site with Flash or frames. Websites that are built entirely on Flash or frames will prevent search engine robots from crawling the content of your site, which will be a disaster for SEO. You should not use a splash page as both search engine spiders and website visitors do not like it. Avoid using JavaScript too.

RELATED POST:

3. Remember to tag your images with keyword-rich description. For every image on your website, it has an Alt tag. You should place important keywords or key phrases inside here to describe the image. And do not place text as an image inside your website. This will prevent search engine spiders from crawling the content and will destroy all your other SEO effort.

4. Place keywords inside your Title and Meta tags. Title is the most important place to put your keywords. Most companies just put their company names in the Title tag which is not enough. Place keywords that you wish to rank well on search engines at the front of the Title and inside your Meta Description tags.


5. Have a sitemap on your website. A sitemap allows search engine spiders to follow all the links and index every pages of your website easily,which will assist your optimization process greatly.

Baca Selengkapnya ....

Learn How To Install Blogger Template easily For Newbie

Posted by Unknown Kamis, 29 Agustus 2013 0 komentar
Installing Blogger Template is a simple Process,but new bloggers sometime take a wrong step and as a result they lose their all blog posts/content.In this regard i will share some tips about how to install a blogger template. Installing any blogger template to blog is not a great deal,So Uploading Template to blogs just require some steps which are mentioned below.

1. Backup: The main thing is when ever you want to upload/install a template to your blog,must backup your Blog template,if you if did not may be you lost your blog posts.

2. Extracting Blog template and uploading to your blog.

3. Editing and installing.

4. Never Remove Copy Rights

HOW TO BACKUP BLOGGER TEMPLATE
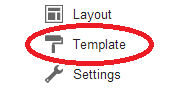
Now Visit Blogger dashboard. Click On Template (See the image below)

How To Install Blogger Template easily

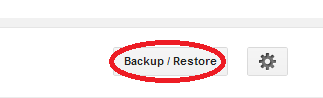
See here and there, you will see Restore/Backup at the left site of your blogger,most of your PC Screen (Shown Below)

How To Install Blogger Template easily

Now Click On Download Full template look the blow image.

How To Install Blogger Template easily

Now you will see a file in Downloads Directory (some thing like template12344. xml) and that's it.


How To Install Blogger Template: Now goto your Blogger Dasbaord Then Click on template and now Click On Backup/restore A Box will pop up Click on Chose File Now Select the .XML File of template and hit upload That's it, you have uploaded the template :D.

Extracting Template from RAR: You may have seen that usually bloggers upload template in RAR Files, so now you have to extract the template from RAR.

For Extracting follow the belowt steps. Click On Template (which is in .RAR File) Now Right Click on filename.xml and click on Extract, then select Desktop and now you will see that file has been extracted to the Desktop.

Can I Remove Copyrights? Template Authors wasted too much time on designing a Blogger template,and another thing they are allowing you to download the template for free. So as a Credit award to them with the footer link of their blog. If you remove Copy Rights they can surely report your blog to DMCA and as a result of that your blog will be deleted within 24 hours.So Be Care full, always be original,never edit or copy.

Hit the share bottom and invite your friend..

Baca Selengkapnya ....

HOW TO ADDED A SITEMAP WIDGET TO YOUR BLOG

Posted by Unknown Rabu, 28 Agustus 2013 0 komentar
As your a good blogger Must Get a Sitemap Widget for Your Blogger blog.

Sitemap is an organized list of a site's webpages which is accessible to visitors and web crawlers.

Sitemap documents are in xml for search engine bots to index the site; and html for visitors to easily find the content of the site just like a map. I will zero in on this type of sitemap for visitors and how you can add it to your blogger blog.

HOW TO ADDED A SITEMAP WIDGET TO YOUR BLOG


The purpose of making your sitemap available to visitors is that they can easily access every single post in your blog. And it will definitely increase your traffic and SEO ranking.

HOW TO ADD SITEMAP WIDGET TO YOUR BLOG

Login in to your blogger dashboard, Beside the blog you want to add the widget,click the dropdown menu (i.e that grey ▼beside the post icon). Click on PAGES then >> click on New page button, Select "Blank page" and write "Sitemap" as the title of the page while you can copy and paste this below code in the body.


 <script src="http://yourjavascript.com/30112272102/wilbersoft-sitemap-widget.js"></script><script src="http://YOUR BLOG URL HERE/feeds/posts/default?max-results=9999&alt=json-in-script&callback=loadtoc"></script>

Replace YOUR BLOG URL HERE with your own blog url and hit the Publish Button.

Congrats! You have successfully added the sitemap widget to your blog. Feel free to drop your
comments and ask us if you have a problem during added the sitemap in your blogger/blogspot enjoy.

Happy blogging.

Baca Selengkapnya ....

Simple Way to Publish a Blog Post via your Mobile Phone

Posted by Unknown Minggu, 18 Agustus 2013 0 komentar
Since the introduction of the new blogger interface at the last two year's ago, it does not been easy for mobile bloggers to make a posts with thumbnails except they copy images from the internet and use it on their blogs. But this method of copying has its consequences.

To Get this Done, we will have employ the"Mail To Blogger"Post Method. If you already activated this method, Skip the next step, but if you have Not, follow all this simple steps to publish your blog post using your mobile device without a PC.

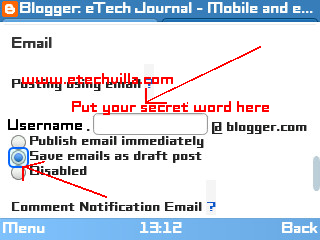
1. Goto Your blogger Dashboard, click on the blog you want to apply this method to, then Click on Settings => Mobile and Email then You will see a text area after your gmail username. In the text area, add a secret word which will be known to only you,select "save email as draft post" then Save the settings.

2. After you are done with the above step, goto your Gmail Account =>Compose a mail then compose the post that you want to publish.

The address you will send the post to is Your Gmail Username, like this SecretWord@blogger.com The Title of the post should be used as the Subject of the Mail and the Post content should be in the Mail Body.

3. Now is to Upload the Images you that want to use for your blog
post,use the mail attachment option to add the images you want to use, then send Mail.

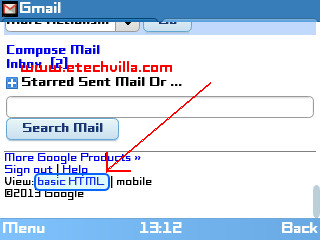
4. If you want to see the attachment option,Your Gmail Must be in Basic HTML to put your gmail in Basic html, goto the buttom of your gmail page and you will see it like in this image below.


5. Now Goto Your Blogger dashboard goto posts click on Draft, then You will find the blog post there, just edit it and arrange the images as you would like them to appear in your blog then click Publish.

Congrat your now success publishing a blog post via your mobile phone if your have any problem just write a comment to us, also share this post to your friends who love blogging tech.

Baca Selengkapnya ....

Top 10 Best Free blogging platforms

Posted by Unknown Selasa, 06 Agustus 2013 0 komentar
best blogging platform


If you are planning to come up with your own blog, but do not want to get into the hassle of
developing, hosting and deploying it by your own, you can opt for the free blogging platforms that are considered the best and can be accessed for free. These platforms offer their users with a large number of features and normally come with both free as well as premium plans.


Top 10 best blogging platforms

1. www.blogger.com

Blogger is a very popular blogging platform owned by Google and offers quite a lot of amazing features to its users. It offers ease of use and mostly beginners prefer opting for Blogger interface. Further more, it offers some features for free which is only available for premium users on other blogging platforms. It can be considered the best free blogging platform and it allows you to monetize your traffic.

2. www.wordpress.com

WordPress happens to be one of the most feature-rich platforms for blogging available until now. It happens to be one of the most popular and well accepted open sourced web applications with numerous useful features even in its free version such as gorgeous themes, SEO, anti-spam filters, traffic stats and a lot more. Many other popular blogs like Flickr, people Magazine’s Style Watch, CNN’s Political Ticker also use the WordPress platform for their blogging needs.

3. www.tumblr.com/

Tumblr is a featured-pack and popular microblogging portal. It offers numerous interesting and
outstanding features like audio based blogging, blogging themes, and free customized domains with a lot more. You can even get your Tumblr account linked with your Twitter or Facebook so that you can easily update your social media feeds via a single location.

4. www.livejournal.com

Livejournal, popularly known as LJ, is another user friendly free blogging platform offering the service of free blogging and also social networking. You can create your own networks, interact with others and participate in Polls along blogging.

5. www.weebly.com/

Weebly,it is a lot more than only blogging, it is a totally featured website builder.It offers numerous
features such as maps, audio/video, slide shows,image galleries, drag and drop interface with many others.

6. www.mywapblog.com

Mywapblog is also a mobile blogging platform is optimized and developed specifically for the mobile web. Now forget email-to-post services, start blogging right from your mobile's web browser! Fond of clicking pictures on the move? Now share them as well using our free picture uploads. Upload unlimited photos directly from your mobile phone and show them to the whole world.

7. www.blog.co.uk

They have an interesting and active blog community and it’s totally free to use. The only problem is that as a free user, you’ll have so many ads on your blog. You’ll only be making money for them with your traffic.

8. www.blog.com

It is another vital WordPress-powered platform when it comes to blogging. Just as other services, it holds its own share of advantages and disadvantages. In the free version, it offers its users with amazing themes, various plugins,and many more. The service offers 2GB of storage capacity initially but it can be enhances to with later packages. But,WordPress basic storage capacity is 3GB. However, the bad part is that the service exhibits more adverts than WordPress.

9. www.mobstac.com

Mobstac is another one of the most popular free mobile blogging platform, you can create the mobile blog viawww.mobstac.comand also the another mobile blog platforms is www.mywapblog.comthis two is for mobile user.

10. www.freeblogit.com

It’s also a free WordPress powered blogging platform with incredible free themes to choose
from, its another free blogging platform.

But in my observe With WordPress and Blogger being the most popular and most used, choosing the better between the two popular platforms can be confusing. There are a large number of other blogging platforms available, and opting for a particular one is more of a matter of personal needs.

Baca Selengkapnya ....
Trik SEO Terbaru support Online Shop Baju Wanita - Original design by Bamz | Copyright of Android rush.