Cartoons for Kids - Application Review [ANDROID]

Posted by Unknown Sabtu, 15 Juni 2013 0 komentar

Although missing some important features and the app's performance could be increased, this application can be a big time saver!

The application could be improved mainly because currently it is a straight port from iOS. Despite that, it does what it's supposed to.

The applicaton is available for FREE on Google Play store:
https://play.google.com/store/apps/details?id=com.appbuilder.u297372p510343

Baca Selengkapnya ....

Gravity Screen Off - Forget Manually Locking your Device [Android]

Posted by Unknown Jumat, 14 Juni 2013 0 komentar

Tired of manually locking/unlocking your device? If so, this is the application you have been searching for!

Gravity screen off will automatically lock down your phone when placed on a table and even when put in a pocket! Not only will it lock your device but it will also unlock the screen whenever you pick up the phone in your hands!

It really does work! Give it a try!

The applicaton is available for FREE on Google Play store:
https://play.google.com/store/apps/de...

Original thread:
http://forum.xda-developers.com/showt...

Baca Selengkapnya ....

Daftar Isi

Posted by Unknown Minggu, 09 Juni 2013 0 komentar

Baca Selengkapnya ....

Horizontal menu with sub-tabs in two columns for Blogger

Posted by Unknown Minggu, 02 Juni 2013 0 komentar
This is a very nice horizontal menu in which its sub-tabs are displayed in two columns and is also made with CSS, without any scripts.
blogger navigation menu, css menu, drop-down menu
The "advantage" so to speak, is that the sub-tabs when arranged in two columns are not very long, so it will be neat and less space along. You can see an example here:


Adding A Horizontal Menu With Sub Tabs in Two Columns To Blogger

STEP 1: In Blogger, go to your "Layout" and on the "Page Elements" section.
  • Click on the "Add a Gadget" link just under your header image
  • From the Gadget's List, select "HTML/JavaScript" option.
STEP 2: Simply copy and paste this ENTIRE code into your widget. Note: Leave the "Title" section of this widget blank.
<div id='menucol'>
<div id='topwrapper'>
<ul id='top'>
<li><a href='http://YOUR URL HERE.com'>Tab 1 Title Here</a></li>
<li><a href='http://YOUR URL HERE.com'>Tab 2 Title Here</a></li>
<li><a class='submenucol' href='#'>Tab 3 Title Here</a>
<ul>
<li><a href='http://YOUR URL HERE.com'>Sub Tab 3.1</a></li>
<li><a href='http://YOUR URL HERE.com'>Sub Tab 3.2</a></li>
<li><a href='http://YOUR URL HERE.com'>Sub Tab 3.3</a></li>
<li><a href='http://YOUR URL HERE.com'>Sub Tab 3.4</a></li>
<li><a href='http://YOUR URL HERE.com'>Sub Tab 3.5</a></li>
<li><a href='http://YOUR URL HERE.com'>Sub Tab 3.6</a></li>
</ul>
</li>
<li><a class='submenucol' href='#'>Tab 4 Title Here</a>
<ul>
<li><a href='http://YOUR URL HERE.com'>Sub Tab 4.1</a></li>
<li><a href='http://YOUR URL HERE.com'>Sub Tab 4.2</a></li>
<li><a href='http://YOUR URL HERE.com'>Sub Tab 4.3</a></li>
<li><a href='http://YOUR URL HERE.com'>Sub Tab 4.4</a></li>
<li><a href='http://YOUR URL HERE.com'>Sub Tab 4.5</a></li>
<li><a href='http://YOUR URL HERE.com'>Sub Tab 4.6</a></li>
</ul>
</li>
<li><a class='submenucol' href='#'>Tab 5 Title Here</a>
<ul>
<li><a href='http://YOUR URL HERE.com'>Sub Tab 5.1</a></li>
<li><a href='http://YOUR URL HERE.com'>Sub Tab 5.2</a></li>
<li><a href='http://YOUR URL HERE.com'>Sub Tab 5.3</a></li>
<li><a href='http://YOUR URL HERE.com'>Sub Tab 5.4</a></li>
<li><a href='http://YOUR URL HERE.com'>Sub Tab 5.5</a></li>
<li><a href='http://YOUR URL HERE.com'>Sub Tab 5.6</a></li>
<li><a href='http://YOUR URL HERE.com'>Sub Tab 5.7</a></li>
<li><a href='http://YOUR URL HERE.com'>Sub Tab 5.8</a></li>
</ul>
</li>
<li><a href='http://YOUR URL HERE.com'>Tab 6 Title Here</a></li>

</ul>
<br class='clearit'/>
</div>
</div>
Customize your main tabs by changing the Tab Titles to whatever you want. Include a URL for each one if you want it to be 'clickable'. If not, you can just put a # sign where it says http://YOUR URL HERE.com

You can add or delete as many of the main tabs as you need, just make sure to copy the entire code for the main tab for each additional tab you want:
<li><a href='http://YOUR URL HERE.com'>Tab 7 Title Here</a>
<ul>
<li><a href='http://YOUR URL HERE.com'>Sub Tab 7.1</a></li>
<li><a href='http://YOUR URL HERE.com'>Sub Tab 7.2</a></li>
<li><a href='http://YOUR URL HERE.com'>Sub Tab 7.3</a></li>
</ul>
</li>
STEP 3: Now let's go a step further and add the CSS style in our Template
  • Go to Template > Edit HTML
  • Click on the sideways arrow next to <b:skin>...</b:skin> 

  • Then click anywhere inside the code area and search - using CTRL + F keys - for the ]]></b:skin> tag and just above ]]></b:skin> add this code:
/* Horizontal menu with 2 columns
----------------------------------------------- */
#menucol {
width:940px;
height:37px;
background-image: -moz-linear-gradient(top, #666666, #000000);
background-image: -webkit-gradient(linear, left top, left bottom, color-stop(0.00, #666666), color-stop(1.0, #000000));
filter: progid:DXImageTransform.Microsoft.Gradient(gradientType=0,startColorStr=#666666,endColorStr=#000000);
border-bottom:1px solid #666666;
border-top:1px solid #666666;
margin:0 auto;padding:0 auto;
overflow:hidden;
}
#topwrapper {
width:940px;
height:40px;
margin:0 auto;
padding:0 auto;
}
.clearit {
clear: both;
height: 0;
line-height: 0.0;
font-size: 0;
}
#top {
width:100%;
}
#top, #top ul {
padding: 0;
margin: 0;
list-style: none;
}
#top a {
border-right:1px solid #333333;
text-align:left;
display: block;
text-decoration: none;
padding:10px 12px 11px;
font:bold 14px Arial;
text-transform:none;
color:#eee;
}
#top a:hover {
background:#000000;
color:#F6F6F6;
}
#top a.submenucol {
background-image: url(https://blogger.googleusercontent.com/img/b/R29vZ2xl/AVvXsEjHGHci6qrd5N78AQ9S8lmKPd2ASMAUxN9qvc5vKJP5GvS4HW4WpvV2nTW5RTFmPpSlGxgXr8whvWTGC3DGxApV8mDZZkTbxFeQOFKfHAl2SfIBxkw06g6ZAjir-5yojt6DH5eGx37X0nI/s1600/arrow_white.gif);
background-repeat: no-repeat;
padding: 10px 24px 11px 12px;
background-position: right center;
}
#top li {
float: left;
position: relative;
}
#top li {
position: static !important;
width: auto;
}
#top li ul, #top ul li {
width:300px;
}
#top ul li a {
text-align:left;
padding: 6px 15px;
font-size:13px;
font-weight:normal;
text-transform:none;
font-family:Arial, sans-serif;
border:none;
}
#top li ul {
z-index:100;
position: absolute;
display: none;
background-color:#F1F1F1;
margin-left:-80px;
padding:10px 0;
border-radius: 0px 0px 6px 6px;
box-shadow:0 2px 2px rgba(0,0,0,0.6);
filter:alpha(opacity=87);
opacity:.87;
}
#top li ul li {
width:150px;
float:left;
margin:0;
padding:0;
}
#top li:hover ul, #top li.hvr ul {
display: block;
}
#top li:hover ul a, #top li.hvr ul a {
color:#333;
background-color:transparent;
text-decoration:none;
}
#top ul a:hover {
text-decoration:underline!important;
color:#444444 !important;
}
  • Now find (CTRL + F) this line:
/* Tabs
  • It will also have some little lines beneath:
/* Tabs
----------------------------------------------- */
  • And just below these little lines, delete the code below until you reach at:
/* Columns
----------------------------------------------- */
  • Instead of the code that you have removed, add this one:
#crosscol ul {z-index: 200; padding:0 !important;}
#crosscol li:hover {position:relative;}
#crosscol ul li {padding:0 !important;}
.tabs-outer {z-index:1;}
.tabs-inner {padding: 0 0px;}
See this screenshot for more info:
menu for blogger, blogger gadgets, blogger widgets
STEP 4: The final step is to Save the Template and you are done!

Visit your blog to see a beautiful navigation menu just below header.
If you have any questions or need help, leave a comment below.

Baca Selengkapnya ....

Fade In/Out Page Loading Effect On Blogger Posts

Posted by Unknown 0 komentar
A very common effect in jQuery is the fade effect that hides or shows an element by fading it, and we can use it in many ways as for example in the blog's navigation. The following script does just that, by loading the page with a fading effect when we browse on internal links that are in the blog, such as post titles, labels links, archive, navigation links, etc..
jQuery effect, fade in effect, blogger jQuery
You can see an example in this demo blog, click on the title of any post and see the fading effect when the page is loading.

How To Implement the Fade In Loading Effect

1) To put this fading effect on your blog, go to your Template > Edit HTML :

fading effect, blogger blogspot, blogger tricks

2) Click anywhere inside the code area and search for the </head> tag using CTRL + F keys:


3) Then, just above </head> add the following code:
<script src='http://ajax.googleapis.com/ajax/libs/jquery/1.8.2/jquery.min.js' type='text/javascript'/>
<script type='text/javascript'>
//<![CDATA[
$(document).ready(function() {
$("body").css("z-index", "-10");
$("body").fadeIn(0);

$("a").click(function(event){
event.preventDefault();
linkLocation = this.href;
$("body").fadeOut(500, redirectPage); });
function redirectPage() {
window.location = linkLocation;
}
});
//]]>
</script>
<style>
html {
background-color: #F2F2F2; /* Color fading */
}
</style>
4) Save the changes and that's it. In green you can see where to change the color that fades on a loading page.

The original script hides the body of the page while loading, I prefer to change that property with a negative z-index to avoid problems with the search engine robots that may effect the positioning.

Problems?

Consider that such effects could increase the blog loading time, so I recommend using it only when your blog loads fast and does not have too many scripts.

If you already use another version of jQuery remove the other, leaving only this which will be readed first.

If you are using Mootools or Scriptaculous, then you have to make some modifications to the code in order to be compatible.

If you have another script with a fade effect, then it could interfere with this and you might not see anything on the page except the color fading, in such cases it is better without this script.

You can also use this effect only on some links, for example, if you want to appear only when you click on the post titles in the navigation links (older posts and newer posts), and on the top tabs, then replace this line:
$("a").click(function(event){
With this:
$(".post-title a, .blog-pager-older-link, .blog-pager-newer-link, .tabs").click(function(event){
In some cases, the page can load for a second and then load with the fade effect, this may be "normal" because the browser is slow to read the script on page load.

Apart from these drawbacks, I think it's a very elegant way to load blog pages while browsing them, don't you think?

Baca Selengkapnya ....

Hack Foto Profil Facebook Teman

Posted by Unknown Sabtu, 01 Juni 2013 0 komentar

Assalamualaikkum Wr. Wb

Keindahan suatu bunga akan pupus jika ia tak disiram.
Keindahan Ilmu akan Pupus Pula jika tidak di bagi-bagi.

Kali ini MasEdi akan membagikan sebuah tips 'Hack Facebook Dasar'.
Yang akan di Hack adalah Foto Profil Teman Facebook kita. Namun, Lagi-lagi ini hanya permainan belaka untuk pengetahuan.

Tanpa Panjang Lebar, MasEdi Akan Membagikan Tips 'Hack Foto Profil Facebook Teman'

1. Login Di Facebook Sahabat. (MasEdi Memakai Google Chrome)
2. Masuk di Profil kita, kemudian Klik Kanan Foto Profil kita dan Pilih Copy Image URL (Jika memakai Mozilla Firefox - Copy Link Location) seperti gambar dibawah ini.


4. Sekarang Sahabat Masuk di Profil Teman/Sasaran korban Hack. 
    Kemudian Klik Kanan Pada Foto Profil, dan Pilih Inspect Element, seperti pada gambar dibawah ini.


5. Maka akan muncul Kode HTML yang bikin Puyeng. Kemudian Klik kanan pada Kode yang berlatar belakang warna biru, dan Pilih Edit as HTML.


6. Blok kode seperti dibawah ini, mulai dari https samapai .jpg, ini menunjukkan bahwa kode gambar.
   Setelah pastekan Link Image Foto Profil Kalian tadi. 


7. Setelah Kalian pastekan, Klik disembarang tempat yang kosong, dan lihat Hasilnnya.


Demikian Tutorial singkat, semoga dapat menghibur.

Baca Selengkapnya ....

Mengganti Nama Facebook Teman

Posted by Unknown 0 komentar


Assalamualaikkum Wr. Wb
Salam sejahtera dari MasEdi. 
Dunia ini penuh permainan, semua serba indah jika dimainkan.
Contohnya Facebook, banyak sisi Positifnya. 
Nah, Kali ini MasEdi akan membagikan sedikit Tips Hack Dasar Facebook.
Tipsnya adalah ' Hack Nama Facebook Teman'
Maaf ini sekedar iseng-iseng saja, bukan sungguhan.

Langsung saja Ke TKP....
1. Login di Facebook Sahabat. (MasEdi Menggunakan Google Chrome)
2. Pilih salah satu korban teman Facebook Sahabat.
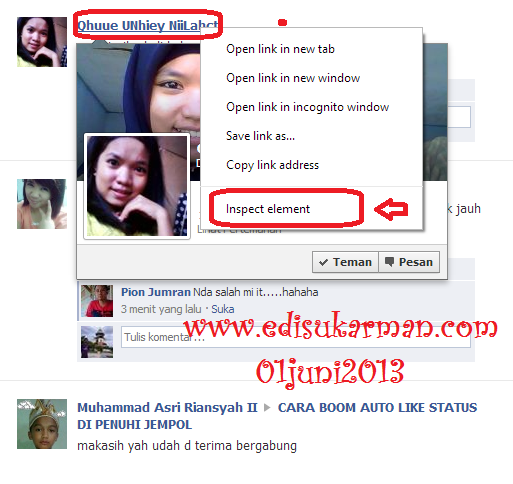
3. Klik kanan pada Nama Facebook , dan Pilih dan klik Inspect element seperti gambar dibawah ini :


4. Setelah itu akan muncul kode HTML yang bikin puyeng.


5. Pada Kode HTML yang berlatar warna biru, Klik Kanan dan Pilih Edit as HTML.


6. Dengan Mengeklik Edit as HTML, maka kita dapat mengedit kode tersebut. Langkah selanjutnya adalah cari nama Teman pada Kode, dan ganti sesuka Sahabat.


 7. Setelah Kalian Ganti, Klik di sembarang tempat yang kosong, dan Lihat Hasilnya,

Demikianlah Tutorial Hack dasar Facebook, dan ini cuma iseng-iseng ajah.
Terima Kasih


Baca Selengkapnya ....
Trik SEO Terbaru support Online Shop Baju Wanita - Original design by Bamz | Copyright of Android rush.